Thursday, 24 April 2014

Exercise: Portrait from Memory


These drawings can be found in Sketchbook pages 48-52 and page 55.

I found this exercise extremely difficult. I don't think my visual memory is very good at all. Either that or I have difficulty translating my visual memory onto the paper.

My first attempt was a portrait of my father. He was on my mind as he has been quite unwell recently. I drew the portrait from memory. I couldn't resist the urge to embellish it with shading and smudging as if to compensate for the lack of accuracy (which of course it didn't - it still didn't look much like my dad - I hope he never sees it!). The basic features are there - beard and bushy eyebrows but the drawing in general feels like a step backwards in comparison to what I'd been doing with the self portraits.


I tried again using someone who I'd seen briefly while watching some rubbish on TV (one of those shows on which young girls try to become models). One of the girls had such striking features that I thought it must be easy to fix her in my memory to draw her. She had a wide eyed look with a very heart shaped face and large lips - she seemed to look permanently worried. My drawing again looks quite naive and child like. In some ways this suits the character of the model but I was confused as to why these drawings from memory should end up looking like a teenager trying too hard had drawn them.


I suspected that what may be happening was that lacking confidence in my ability to recall well enough to draw I had become overly analytical - saying to myself " the eyes are hooded, the eyebrows are bushy" and so on. I thought that maybe the drawing would go better if I used methods more akin to those I used for gesture drawing, so I tried again. This time I tried to hold a visual image of the person in my mind's eye and draw as if I were doing a blind contour drawing from life. This led to much more uninhibited drawings . They weren't any better in terms of likeness but they did capture the essential elements and differences between the two people and I prefer them to my first attempts


Monday, 21 April 2014

Exercise: Self Portrait


These Drawings can be found in sketchbook 6: Pages 19 -23.

My first attempts at a self portrait were done following exercises from a book: "Drawing and Painting People - A Fresh Approach" By Emily Ball (Crowood Press 2009). I found this little book quite inspiring. The first exercise I did involved pushing and pulling around crushed charcoal to try to establish the structure of the face and then working into it with a putty rubber and more charcoal.


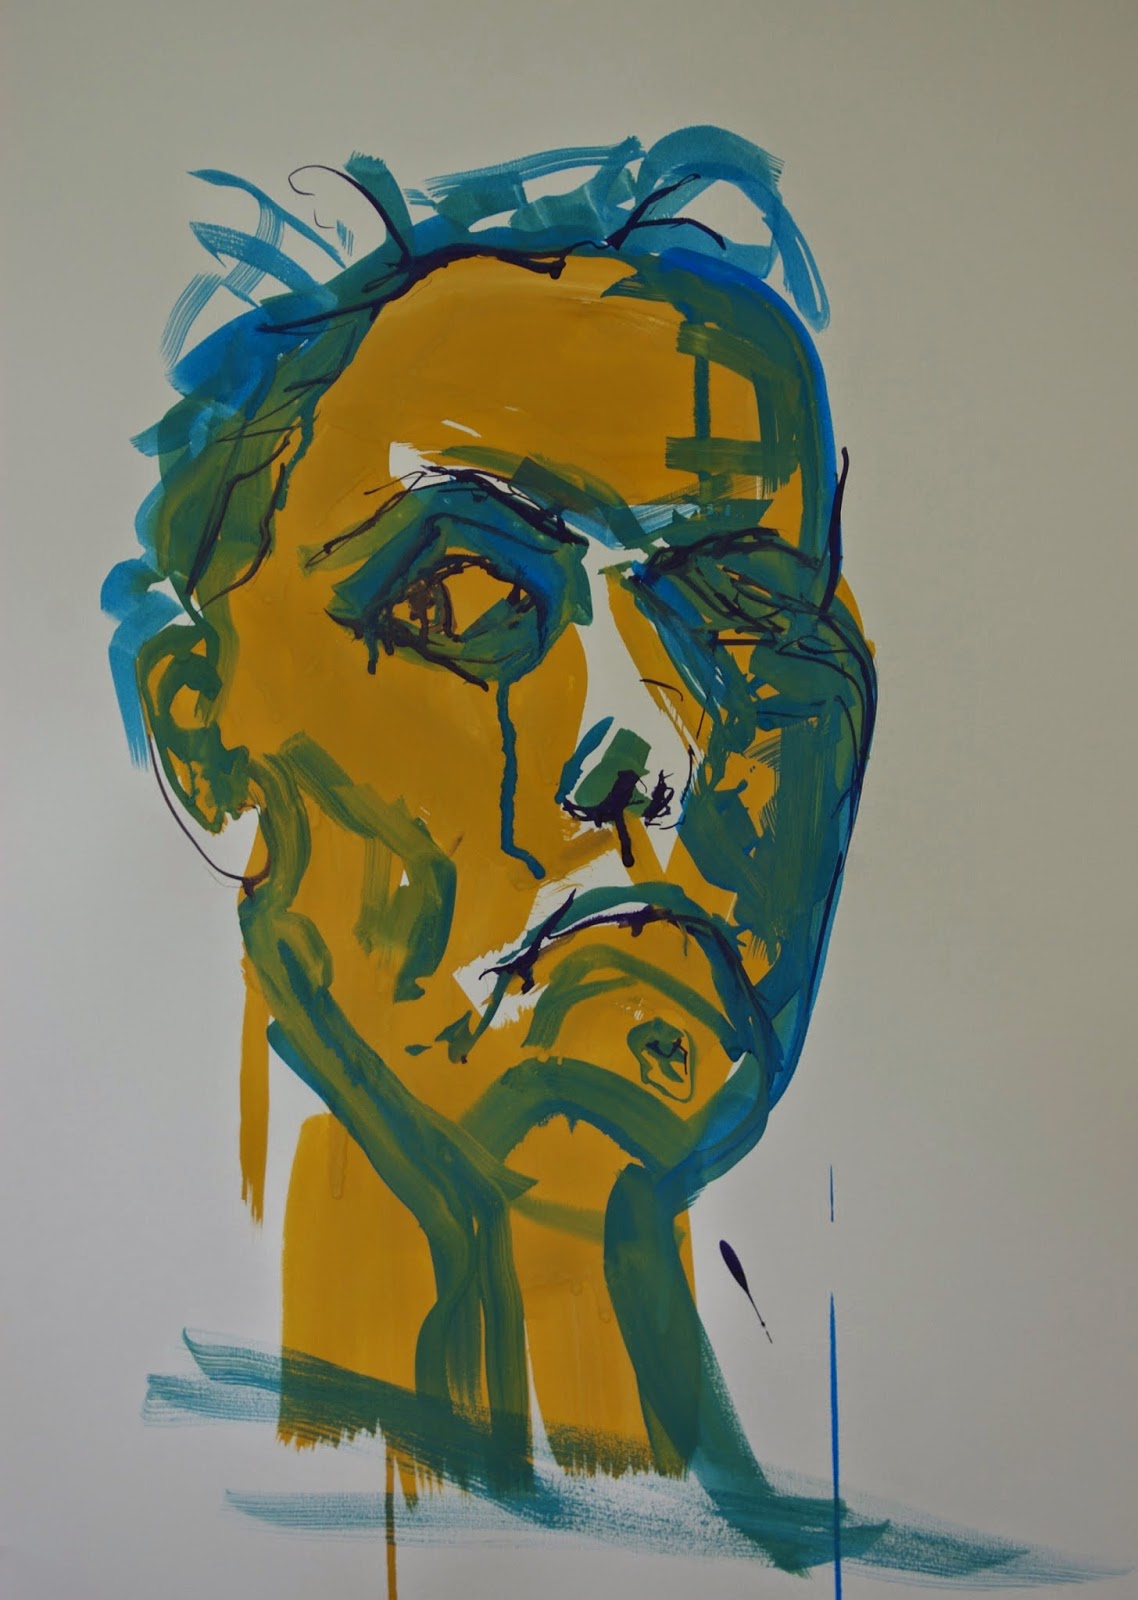
May favourite exercise was "Three colours, three brushes, one head". I used gouache for this exercise. One brush was a large decorator's brush, the second was medium sized and the third was a rigger. I started with a few strokes of the large brush to describe the basic structure and rises and falls of the face in just three strokes. The worked with a different colour on each brush to describe the details. I decided not to choose natural-looking colours. On my first attempt I think I overworked it and also the proportions are off with the eyes being too big and the nose too small. Since this was such a rapid way of painting I had plenty of time to try again.


I was much happier with my second attempt. I managed to resist the urge to over embellish it and I think this painting is much more successful. It really captures my sidelong glance and look of frowning concentration. The accidental run of paint below my eye and the downward turn of my mouth leads everyone who sees it to say I look miserable. It isn't the best likeness of me - once again I have elongated my face. I do, however feel this is a successful drawing/painting.


I had another attempt at a colour portrait using Inktense blocks and water soluble coloured pencils on Bockingford paper. I really got bogged down with this one. It has none of the freshness and vitality of the above exercise. I does look like a face but not my face! With this medium I found it very difficult to make alterations as I went along. I sin't possible to erase and only so many layers can be built up. I quite like the gaze of the eyes on this one but otherwise I don't think this drawing is so successful.


This final drawing in charcoal and white conte' crayon is by popular opinion (of my friends and family) the best likeness of myself that I produced. I started this one by putting a mid tune over the whole head and then subtracting and adding until the face emerged. About halfway through the process it looked hopelessly unlike me and cross-eyed. By continuing the process of addition and subtraction I was able to resolve this into a reasonable likeness so I'm glad I persevered.


Wednesday, 16 April 2014

Project: Self Portrait. Exercise: Drawing Your Face

This exercise can be found in sketchbook 4 : Pages 50-61


First attempts with charcoal and with drawing pen
The profile drawing is wrong as the face and head as
a whole are too narrow and elongated

Graphite sketches and a dawning done blind while feeling my face
The top left drawing looks too masculine - the brow and chin
are too strong

Just for fun I experimented with placing a sheet of tracing paper
on my face and rubbing graphite over it.The results remind me of ancient
stone carvings.

More attempts with drawing pen and with ink and wash. I am
noticing a tendency to overestimate the size of my eyes and
also a repeated tendency to elongate my chin

Further experiments with different angles and lighting. The face lit from
below looks nightmarish. Some of these angles are from
photographs as it was impossible to see these angles with a single mirror 

Trying to simplify the representation of facial features and looking
more closely at facial proportions.

I had more time to work on the self portrait project because it did not require me to pin down another person to model for me. I try to look in the mirror as little as possible these days as the ageing features don't correspond with how I feel or how I want to look. It is quite difficult to be objective when studying your own face, However, over the multiple sketches I got more familiar and less daunted by the subject.

Tuesday, 15 April 2014

Check and Log:The Moving Figure

How well  did you manage to convey the sense of a fleeting moment rather than a pose?

I do think that most of m y drawings in this section convey a sense of movement and fleeting moments. This is because they were, by necessity drawn extremely rapidly. I think the most successful drawings are the continuous line drawings, most of which were drawn virtually blind with just the occasional peek at the paper or the i-pad screen (I often draw on the i-pad in the airport as it makes me feel less conspicuous than drawing on paper). These drawings have a partially abstracted quality about them which I like but they still 'read' as human forms.

How successful were your attempts to retain an image and draw later?

Not successful at all! This exercise has led me to understand that my visual memory is really quite poor. Any attempt to draw someone's previous position after they had moved resulted in a very stiff 'stick man' appearance. I seem to panic when the image to be drawn is no longer in front of me. I guess this requires more practice.

Were you able to keep to a few descriptive lines to suggest the person's movement or were you tempted to keep introducing more elements into your work?

This improved as I did more sessions of drawing at the airport. Initially my sketches looked a bit  hesitant with multiple lines and complete outlines of the figures. Gradually I began to control the impulse to be over detailed as I realised how little was required for the figure and movement to be readable. The more successful drawings are the continuous line drawings especially those drawn 'blind' on the i-pad and those drawn  with a bamboo pen and ink.


Monday, 14 April 2014

Research Point: People watching

A man explaining something to a woman. There was a
lot of pointing and gesturing going on. It was clearly something
he felt very strongly about 

Bored people in a queue just standing idly around and
staring vacantly into space or listening to music. I alike the abstract
quality of this line drawing. they are only just readable as
human forms


I was truck by this man's way of sitting - he was leaning back
on an airport chair with one leg stretched right out in front of
him and the other akimbo. This seemed a very masculine pose
it looked as though he was relaxed and felt he owned the place.
This was in contrast to the women next to him who were gathered in
and cross legged.


Two travelling companions consulting a map


Most of my drawings are done at the airport. There are dejected weary travellers with heavy bags. Mothers trying to soothe  babies. Couples arguing and the general confusion of airport queues. All of these contain very little detail particularly around the head and face. It is surprising how little is required for our brain to read an image as human. What I haven't successfully achieved however is the differences in facial structure between men and women. Men have stronger brows and chins. However, I have not produced any facial detail in any of my drawings.


Amidst all the confusion of an airport queue, the large guy
 in the centre was bring to use his big shoulders to shove
and jostle his way towards the front.

Thursday, 10 April 2014

Exercise: Fleeting Moments

It was a sunny Sunday so we took a day trip to Sorrento. There is a terrace which overlooks the bay of Naples and Vesuvius providing a spectacular view. When we arrived there  there was a large group of Japanese tourists already there. I found watching the people more interesting than looking at the view (which I've seem many times before). Very few of the people there were looking at the scenery without the view being mediated by a screen of some kind - either a table or a camera of a phone. I did deverel quick sketches of the tourists taking selfies and photos of each other to document their trip to this place on social media.

I liked the angle of the pose of this guy as he leaned casually on the railing for his friend to take a photo:


This elderly lady in a beret and a hooded jacket looked slightly bewildered. She had her phone in hand but seemed a bit uncertain as to what to photograph. I think this is the most successful drawing of this series as I used continuous line and was more selective than in the previous four drawings. I subsequently reproduced this drawing using an adaptation of the 'oil transfer' technique I saw at the Klee exhibition. I covered one side of an acetate sheet with oil pastel and redrew the line drawing on the reverse side so that it was transferred onto the paper beneath. I then embellished the background with watercolour.


I also did a rapid sketch of my son leaning on the railing and glancing back towards me. I used the oil transfer technique again and coloured pencil to reproduce this drawing:


Wednesday, 9 April 2014

Project: The moving figure. Exercise: Sitting and Waiting


I spend a lot of time in airports and this provides a good opportunity for people watching. Initially I started out by using a small sketchbook. The initial drawings are quite sketchy with multiple lines of uncertainty - this is partly the result of self-consciousness when drawing in public places. As time went on I made an effort to improve this by reverting to continuous line drawing and gave myself permission not to get tied up in thinking about proportions. People move all the time - it is rare for even queuing people to stand still for longer than a minute - they constantly shift their weight from foot to foot or look around or talk and gesture. Drawing people in public requires rapid and confident hand movements and retaining movements for a short time in the visual memory.

I liked the quality of the biro sketches and adapted some of these in the last sketch which I did with a bamboo pen and brown ink. I think the addition of the perspective of the queue as well as the continuous line make the drawing quite dynamic. I particularly like the woman walking away from us pulling a small suitcase.


Tuesday, 8 April 2014

Check and Log: The Clothed Figure

Did you find it easy to approach the figure as a whole or were you distracted by details of the sitter's dress?

Details of the sitters dress were certainly distracting. On the coloured pencil drawing, however, I did feel that I successfully negotiated the distractions and managed to convey the weight of the figure and create a reasonably well-proportioned drawing. 

How did you create volume in the folds of fabric?

I used variation in tonal values to create volume in the folds of fabric. The deepest creases were where the darkest tones were found with the lightest areas being on the crests between the folds.

Does the finished drawing give a sense of the figure beneath the fabric?

Although I did find the folded fabric of the dressing gown quite distracting, I do think that the coloured pencil drawing does give a sense of the structure of the body beneath it. The ink drawing is not so successful in this respect.

How would you tackle a drawing like this again?

Instead of launching immediately into drawing the fabric I would probably look at measuring the relationships between the parts of  the future first such that I had a framework on which to superimpose the folds of fabric. that way I could be more confident in placing the folds in the correct position on the body such that the enhance the feeling of weight rather than distracting and interfering. So essentially I would try to see through the fabric to the figure underneath before starting to draw.


Exercise: Form and Movement in a Clothed Figure

Here I have photographed two examples of work I did on the OCA workshop I attended. I like the strong lines that the model's cagoul made as he moved around.


I drew two drawings of Luigi seated for this exercise (photographs to follow). They can be found on pages 60 and 61 of sketchbook 5.

The first drawing was in coloured pencil. Overall I do think that it adequately describes the form and gives an impression of the folds in the fabric. It is however, a bit staid and not a particularly exciting drawing The next day I tried to do a freer drawing using ink - this time Luigi was wrapped in a sheet. I wasn't having a good day that day. I scribbled away at it for a short time and then decided enough was enough for today. The mark making on this second drawing was more exciting but the proportions and representation of the folds was not as good as the foes drawing.


Project: The Clothed Figure. Exercise: Fabric with Line and Form

This exercise was also more difficult than I expected - the results are on pages 53 and pages 63 - 69 of sketchbook 5). Before embarking on the exercise I looked at drapery studies by Albrecht Durer, Degas, Michlengelo and various more modern artists. Some examples are on page 68 of sketchbook 5.

The first part consisted of drawing 15 minute sketches of folded fabric using line only in soft pencil or charcoal. Initially I felt overwhelmed by the number of folds and got easily lost. I also was somewhat confounded by the instruction to use line only when my instinct was to do a tonal study to describe the crests and troughs of the various folds. I tried using various weights and thicknesses of lines and also using contour lines to describe the folds. 

I looked at an online course "Drawing the Draped Figure" with tutor Matt Weigle. Through this I leaned to identify the prominent types of folds in the fabric and to be more selective with which folds to draw as it is impossible to draw every little crease and fold. 


I did make a step forwards with this exercise but drapery definitely still needs more work as it is very challenging. 


My favourite part of this exercise was the five minute sketches of different parts of the fabric in 5cm squares. identifying individual folds in a more abstract way took away the feeling of being overwhelmed by the mass of fabric and allowed me to concentrate better on representing the form. I tried various methods using coloured pencil, drawing pen, ink, charcoal, conte' and water-soluble media.


Monday, 7 April 2014

Check and Log: Structure

How accurately did you depict the overall proportions of the figure?

I struggled with the overall proportions on some of the drawings. This was especially problematic on the lying down pose with the foreshortening. I really underestimated the effect of foreshortening on the proportions until I measured more thoroughly.  However, notwithstanding these struggles I can see that I have made significant improvements in my understanding of the proportions of the figure over the course of the last few exercises.

Did you try to imagine the sitter's skeleton and muscles? Did this help to convey the figure's structure and form?

I did find this helpful in conveying the structure of the figure. I was particularly attracted to the strong shape of the junction go the lumbar spine, sacrum and pelvis on the lying down pose. On the seated pose. imagining the underlying skeleton help me with my depiction of the hunched shoulders and prominent collarbone of the reading man.


Exercise: Three Drawings - Sitting

I made a few rapid A4 sketches to warm up for this part of the exercise and then rapidly moved on to the drawing itself.


I decided I wanted to use colour as it had been a while since I'd used much colour in this section of the course. I also decided I wash;t going to attempt to use colour in a realistic way but just for tonal values and contrast without being restricted to flesh tones. I positioned my model in a darkened room and there were only two small light sources. There was a small table lamp positioned to one dose of him and there was the light from his tablet (he was reading) which illuminated his face and the front of his torso.

On the first drawing I particularly like the drawing of his right leg coming towards us. I also really like the way this low lighting has delineated his collarbones and the musculature around his shoulders. My attempt to put him in the context of the background, however, didn't really come off . The light coloured piece of furniture in the background was too dominant. I have tried to reduce its impact and 'knock it back' a bit but don't feel it has adequately resolved. ( Sketchbook 6: Page 13). I ended up cropping the picture to remove as much of the offending article as possible.


I tried again, from a slightly different angle on a larger sheet of paper (between A1 and A2 size). I enjoyed this exercise - particularly the freedom with the colour. On this version I think the most successful elements are in his upper body. I like the contrast between the warm yellowish light from the table-lamp illuminating the back of his shoulder and neck and then cold light from the table illuminating his front and reflecting off his glasses. The lower part is not as successful. His forearm looks too long and thin and his legs seem a bit too short. 


Sunday, 6 April 2014

Exercise: Three Drawings - Lying down

The second in the series of three drawings was to be with the figure lying down. The instructions were to 'position yourself at a slight angle to the head so that you are looking down on the model. Note the foreshortening before you begin to draw."

This was a major challenge and I really struggled with it. I decided to use charcoal as there was more scope for corrections to be made than with ink. My first attempt was really not very good at all. I hadn't done any measuring and so didn't capture the foreshortening. He looks as though he is leaning back against an upright surface rather than lying down with his feet towards me. The second attempt was a bit better but on this attempt his arm looked at to be at a very unnatural angle.

First Attempt: I have not adequately
represented the foreshortening 

Second attempt: Foreshortening improving but poor
observation on the arm and shoulder

On the third attempt I used conte' crayon and had the model lying face down with his head towards me. The foreshortening was getting a bit better but I hadn't thought about the composition before I started so his legs ended up bang in the centre of the page. I also really struggled with his hands and found it impossible to make the corrections with the conte' as it stained the paper so I couldn't remove it. I abandoned this attempt.

Poor composition and appallingly bad drawing
of hands - this attempt was abandoned
On the next drawing, you can clearly see how much I struggled with this exercise as you can see the ghosts of the erased lines. I drew it then realised that it wasn't correct for the foreshortening so I spent some time measuring and redrew again on the same page. I was really surprised how dramatically the foreshortening alters the proportions. On measuring it was very clear that my mind drastically underestimates the effect. Lesson learned: where there is foreshortening it pays to measure what you are seeing.

You can clearly see my struggles with the
foreshortening here


Final attempt. Better than the others but there are still problems. His left shoulder
is wrong and I am still not sure about the foreshortening. Also Hands!!!!
The final drawing in this series is the best of a bad bunch. I like the angulation of his head and the positioning of his right hand relative to the head. I like the strong, dark triangular shape of his sacrum. I think the foreshortening is better but am not sure it is right. When I posted this on the OCA sketchbooks group on Facebook I got feedback that his feet and lower legs were too small.  There is a problem with the position of his left shoulder which seems too large relative to his right. Also, knowing how difficult I find drawing hands it was perhaps not my greatest idea to choose a composition in which his hand dominates the foreground.

Saturday, 5 April 2014

Exercise: Three Drawings - Standing

I was pleased that the first of the three drawings was the standing pose as this was likely to pose the fewest difficulties of the three. I drew several small sketches of Luigi in various poses in biro and in drawing ink (Sketchbook 6: Page 4). I then moved on to larger paper, In an attempt to keep the drawing fairly free I decided to use ink and wash with a Japanese Sumi-e brush. The first three drawings below are on A2 paper (Sketchbook 6: Pages 5-7) the last one was A1. 

I enjoyed drawing with this brown washable ink. The ink and brush technique meant that I had to be bold and confident with the line. Some of the drawings are more successful than others, I particularly like the first pose and the last one with his hands behind his neck - I liked the shapes that this made between his forearms and upper arms and the throng vertical of his spine and supporting leg. I retrospect, however, I can see that I've made his forearms rather too skinny. I have also chickened out with the feet. Still not confident about hands and feet - more practise needed.